CCM Scan Report
Overview
The CCM Scan Report provides visibility into the cookies, vendors, and privacy findings detected across websites configured in the Cookie Consent Management (CCM) module. It helps organizations understand which cookies and third-party vendors are tracking or processing potentially personal information (PI) and monitor how website tracking behaviour changes over time.
Steps To configure a CCM Scan report:
- Sign into your Data Governance Tool account.
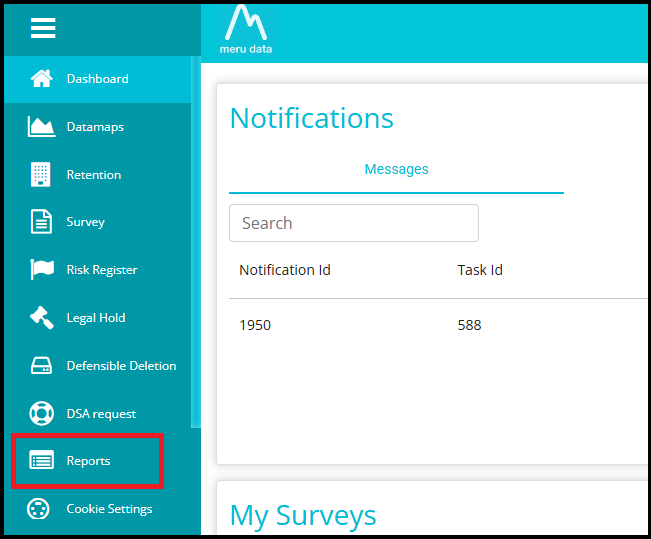
- Click on the hamburger.
 icon to open the menu.
- Select 'Reports' from the menu.
- Click on the Manage reports button on the screen.

- You will be directed to the report management page.
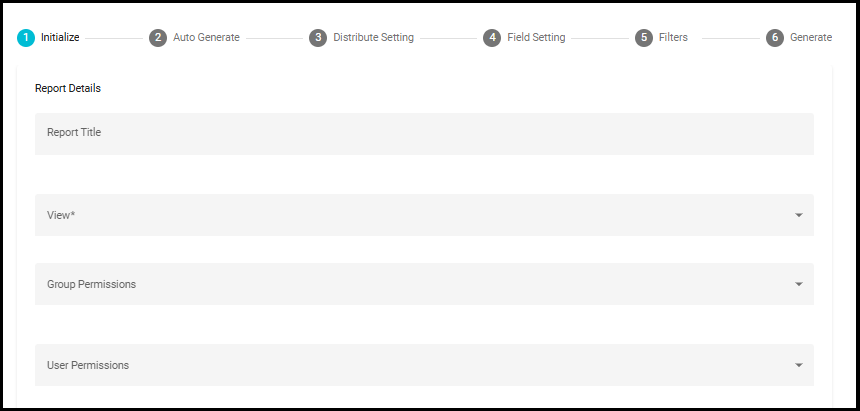
- Initialize the Report
- Report Title: Add a custom Title to the report.
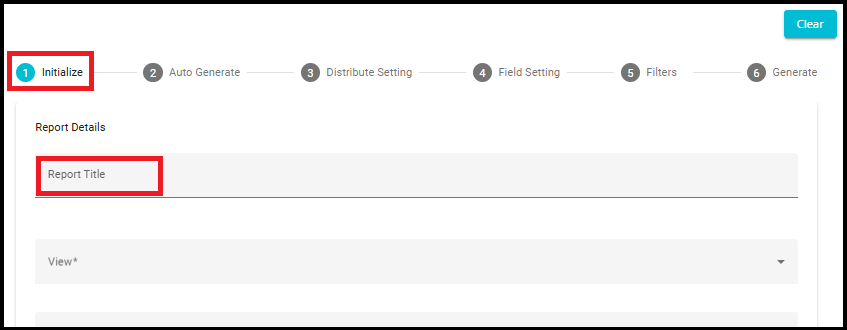
Group Permissions: From the drop-down menu, select the groups to which this Report should be made available. The report will be visible in the Reports module for the selected user groups.
User Permissions: If the admin prefers not to expose the report to the entire group, it can be published at the user level. From the drop-down menu, select the users to which this Report should be made available. The report will be visible in the Reports module for the selected users.

- View: Select "CCM Scan Report" from the drop-down menu.
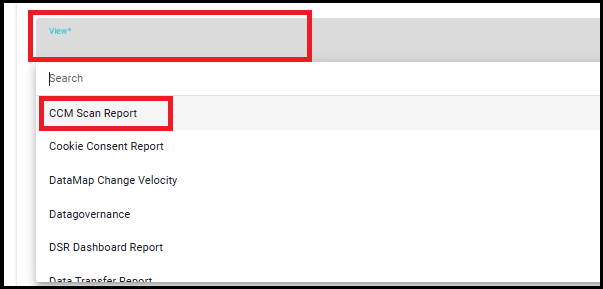
- Once the CCM Scan Report is selected, the following fields will be available: Config Names, and Websites.

- Config Names -- Select one or more CCM configurations from the dropdown. The CCM Scan Report supports multiple CCM configurations, allowing you to include scan data from different configurations in a single report.
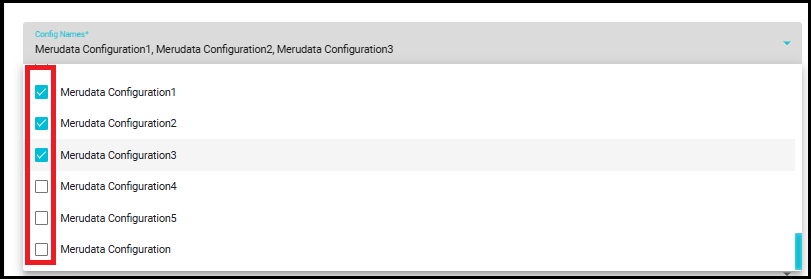
- Website -- Displays the websites associated with the selected configurations. You can select multiple URLs across multiple CCM configurations, enabling you to view and analyse scan results for all chosen websites within a single report rather than being limited to a single configuration or URL.

- Auto Generate
The Auto-Generate Reports feature streamlines the reporting process by allowing users to schedule report generation at their preferred frequency-weekly, Biweekly, monthly, Quarterly, Half-yearly or yearly.
Report versions are automatically generated based on the defined frequency only when changes are detected in the report content. This includes any addition or removal of data.
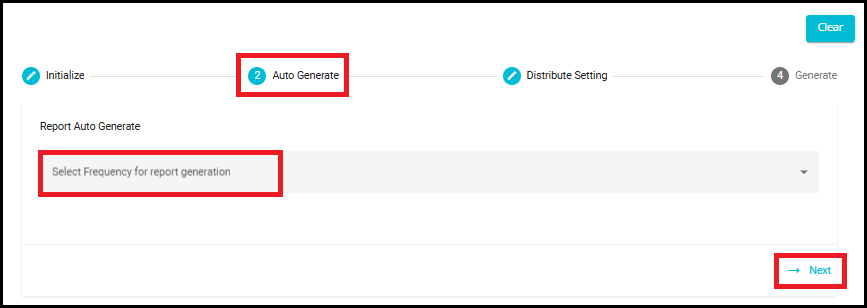
Click on the "Next" arrow located at the bottom right corner of the "Auto Generate" section.
This will take you from Step 2: Auto Generate to Step 3: Distribute Setting, where you can configure how and to whom the reports will be sent.
- Distribute Setting
Note (CCM Scan Reports Only): Distribution emails are sent only when a new scan version becomes available. On each scheduled distribution date, the system checks whether a newer scan version exists compared to the version that was previously distributed.
For example, if Scan Version 4 was distributed to users this month and the next scheduled distribution occurs next month:
If a new scan version (Version 5) is available, the report distribution email will be sent, and users will receive access to Version 5.
If no new scan version has been generated and Version 4 remains the latest version, the system will not send Version 4 again.
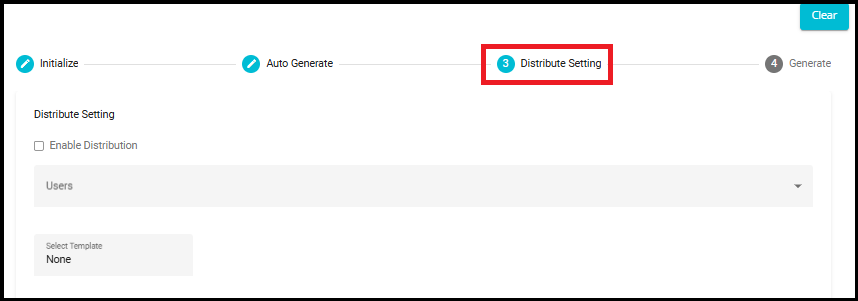
- Enable Distribution
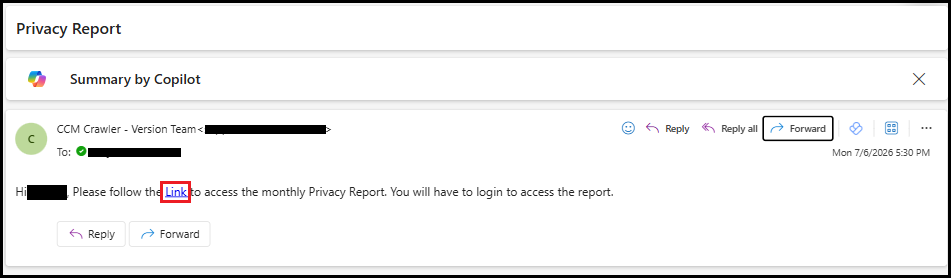
When you select the Enable Distribution option you will receive an email notification with a direct link to access your report.

Clicking the link takes the user directly to the corresponding CCM Scan Report in the Reports module.
This eliminates the need to navigate through menus, search for the report, or select it from the report dropdown, making report access faster and more convenient.
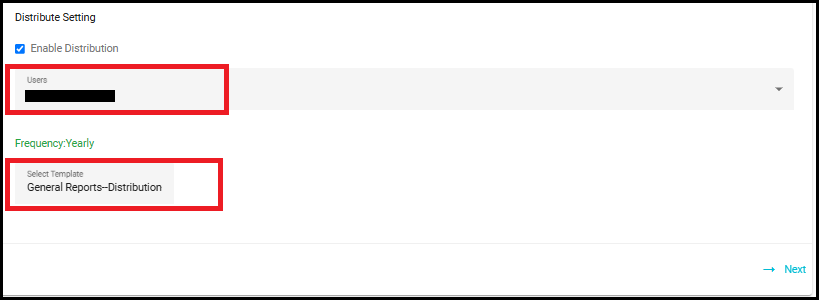
Select Users
Use the user selection dropdown to choose recipients.
You can select one or multiple users based on your distribution needs.
Select Template
When you select a template from the dropdown, you choose the email format that will be used to send notifications.
These templates define how email looks and what content it includes. You can customize these templates through the Configure Email module.
If you do not select any template, the frequency field will not be displayed, meaning you won't be able to schedule how often the report is sent. However, once you select a template, the frequency option will appear.
Frequency
Allows you to choose how often the report should be distributed. The frequency of these email notifications is not limited to weekly.
It depends entirely on the frequency you select during setup.
You can choose to receive the report hourly, daily, weekly, Biweekly, monthly, Quarterly, Half-yearly or yearly.
You can modify the frequency of email notifications in the "Configure Email" module during the report setup process.
To learn more about setting up and managing email configurations, refer to the ConfigureEmail
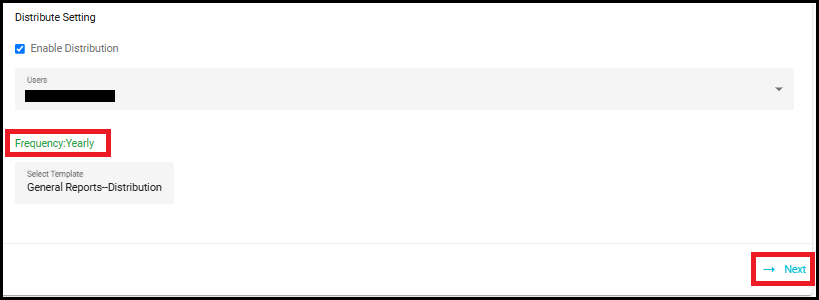
- Click the "Next" arrow located at the bottom right corner of the screen.
- Generate
On this section, you can see the summary of the configuration for the report that is about to generate. Changes can be made by going back to the sections of your choice and making the required changes. Finally, clicking Generate Report, the configuration will be saved, the report will be available in the Reports Module for those users and groups with permission, and the users selected will receive a copy of the report on their email.
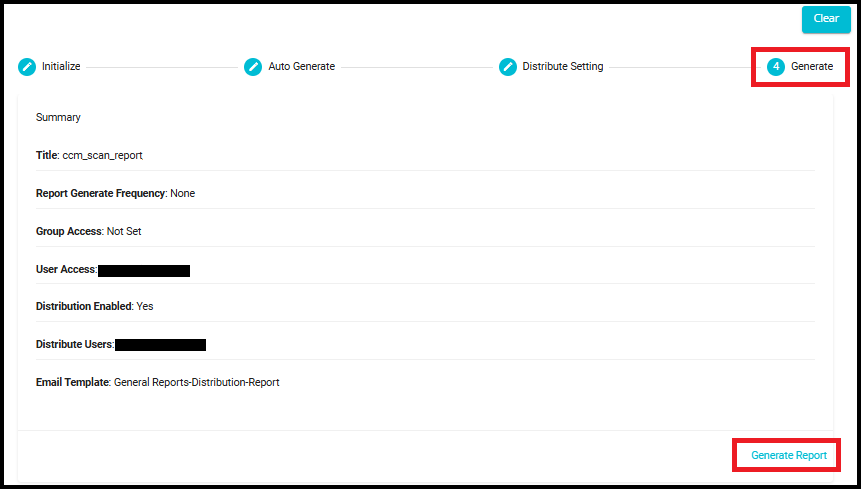
- If you decide to discard the configuration for the report, you can click the
 button.
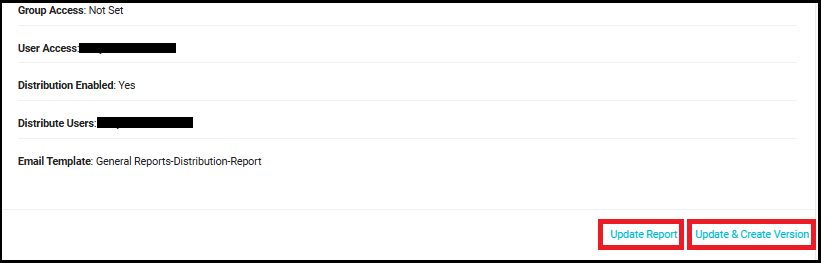
- Updating the Report
Update Report: Make changes to a report without creating a new version---ideal for quick edits or corrections.
Update & Create Version: Save a modified report as a new version, preserving the original while capturing changes. Each version is time-stamped for easy reference.
Steps to view CCM Scan report:
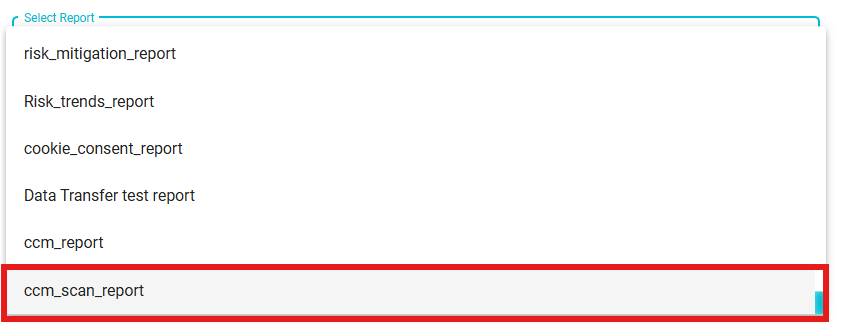
- Click on the "Select a Report" dropdown on the Reports page to choose and view a specific report.

2. From the dropdown, select the required CCM Scan report.
- On clicking, the report will be displayed in the following format.
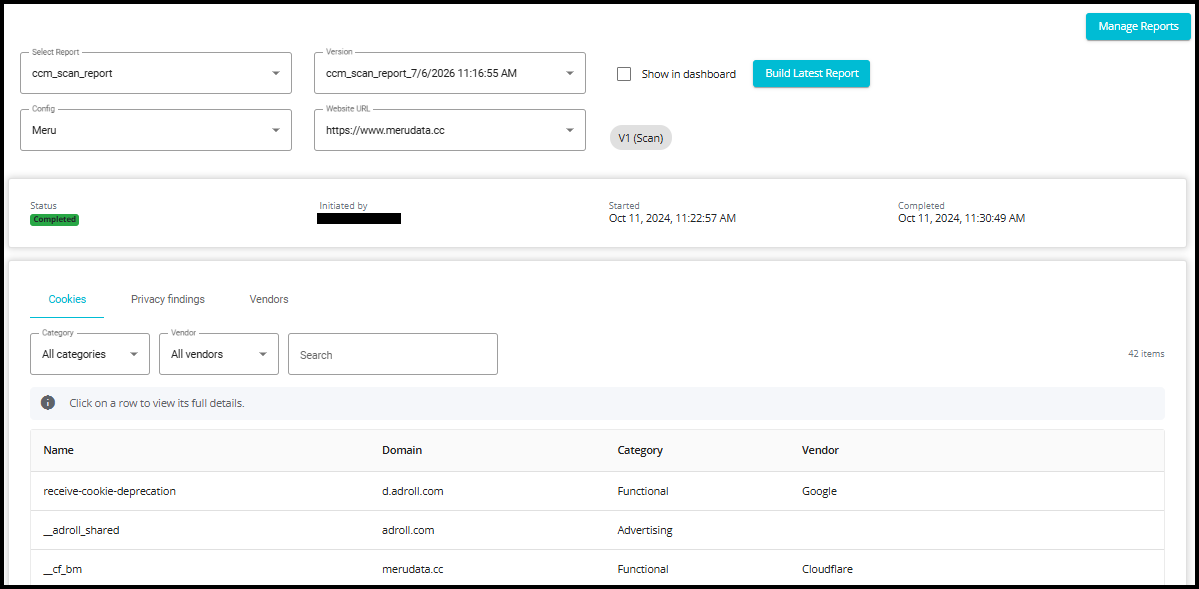
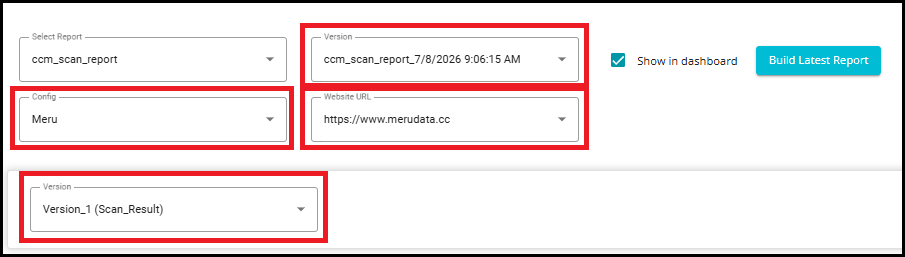
Version -- Displays all available versions of the selected CCM Scan Report. Each version represents a snapshot of the report generated at a specific point in time. Users can switch between versions to compare report data and track changes over time.
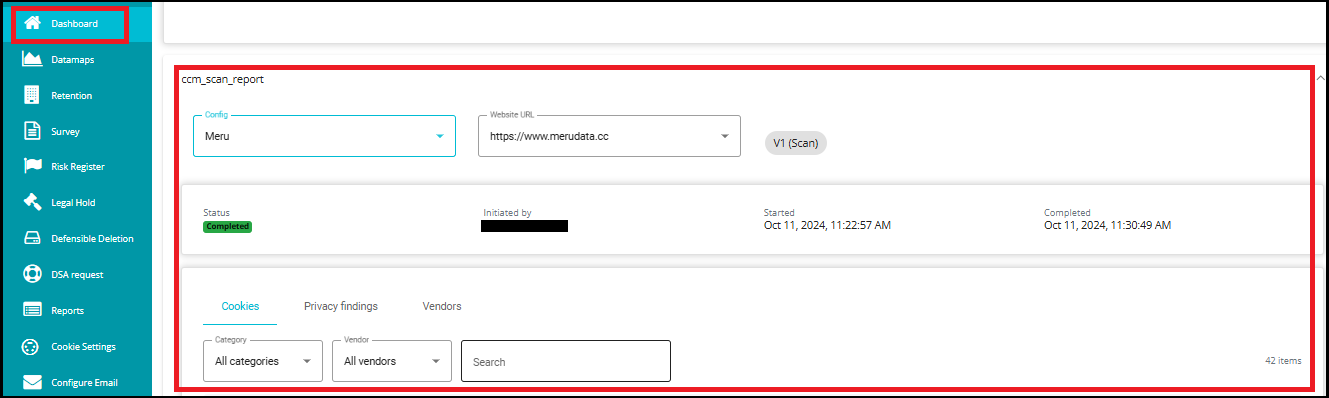
Config -- Displays the CCM configurations that were selected during the Initialize step while creating the report. If multiple configurations were included in the report setup, they will be available in this dropdown. Select the required configuration to view scan results related to that configuration.
Website URL -- Displays the website URLs associated with the selected configuration. The URLs shown in this dropdown are based on the websites selected during the Initialize step. Users can choose the required URL to view scan results specific to that website.
Version -- The Version dropdown displays all available versions of the selected CCM Scan Report.
- If the selected configuration and website have only one scan version, the Compare Versions button is not displayed because there are no additional versions available for comparison. In this case, users can only view the scan results for the available version (for example, Version_1 (Scan_Result)).
Note: The report always opens in Single Report View and displays the results of the latest scan version, including all available Cookies and Privacy Findings data. The Compare Versions button is displayed only when multiple scan versions are available.
- To compare scan versions, click Compare Versions.

By default, the system compares the latest version against the previous (legacy) version.
Users can change the selected versions using the Baseline and Compare To dropdowns to compare any available version combination.
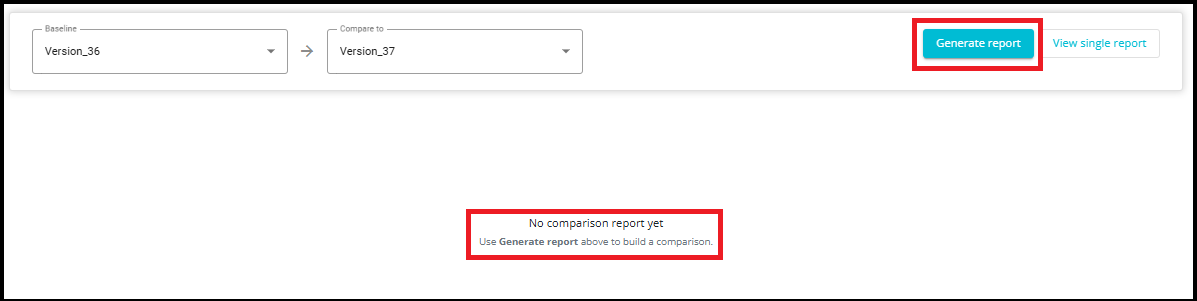
If a Comparison Report Does Not Exist
If a comparison report does not exist for the selected versions, the system displays a message indicating that no comparison report is available.
Click Generate Report in the upper-right corner of the screen.
- Once the report generation process starts, a message is displayed on the screen: "Report is being generated. You'll receive a notification when it's ready."

Note: Comparison report generation is a one-time process for a specific version pair. Once the report has been generated, users can access it directly through Compare Versions without generating it again.
Viewing Comparison Report Notifications
- Click the bell (Notifications) icon in the top-right corner of the screen.

The system opens the Recent Activity Logs page.
Locate the version comparison activity entry.
Click the activity entry to open the generated comparison report directly.
The Time column displays when the report was generated, helping users track recent report generation activities.
The Recent Activity Logs page provides the following options:
Refresh -- Reloads the activity log list and retrieves the latest notifications.
Mark All Read -- Marks all activity log entries as read.
Clear All -- Removes all activity log entries from the notification list.

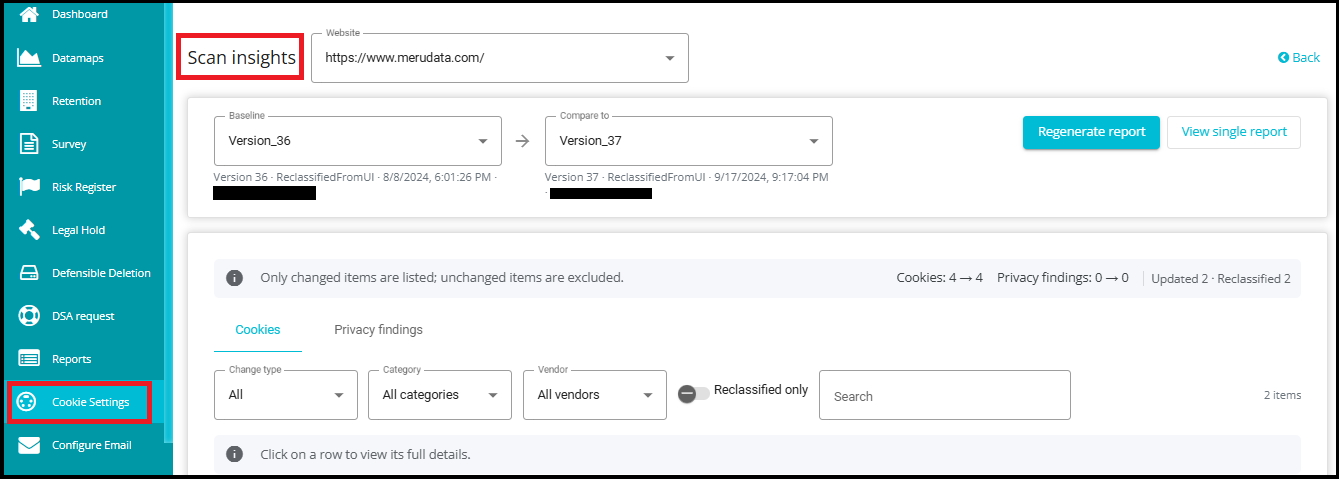
- After clicking the activity entry in Recent Activity Logs, the system navigates you directly to the Scan Insights page within the Cookie Settings module and opens the comparison report for the selected version pair.
If a Comparison Report Already Exists
If a comparison report already exists for the selected versions, it is displayed immediately.
The comparison displays only the items that have changed between the two versions. Unchanged items are excluded to help users focus on the differences.
Example
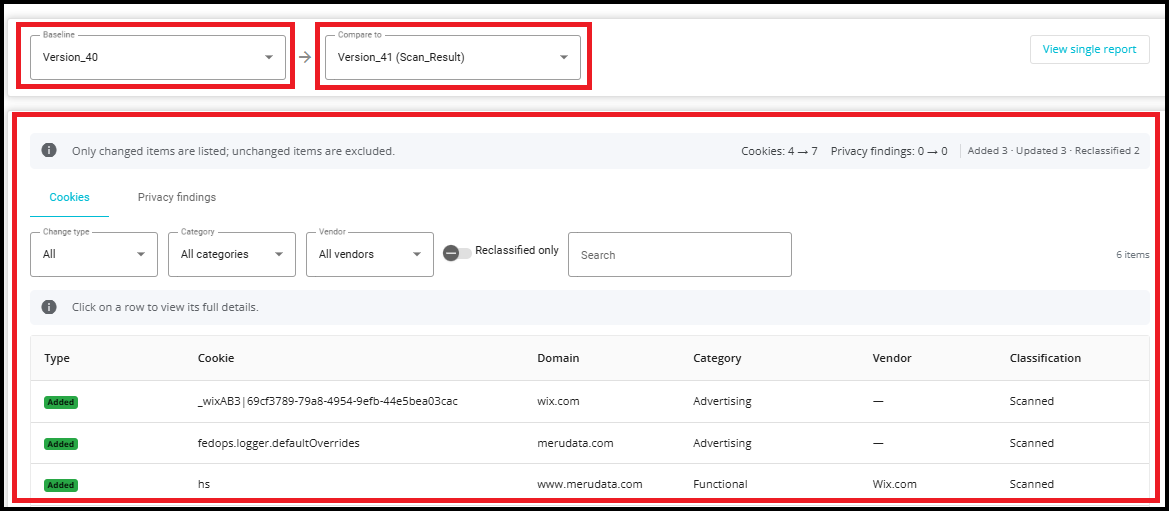
- If the latest scan version is Version 41 (Scan) and the previous version is Version 40 (Reclassified), the report automatically compares: Version 41 vs Version 40
The comparison view displays:
Cookies count changes (for example, 4 → 7).
Privacy Findings count changes.
Newly added cookies.
Updated or modified cookies.
Deleted cookies
Reclassified cookies.
Status -- Displays the status of the selected scan. This indicates whether the scan has been completed successfully, is in progress, or encountered any issues.
Initiated By -- Displays who initiated the scan. If the scan was manually triggered by a user, the name of that user is shown. If the scan was automatically triggered by the system, System is displayed.
Started -- Displays the date and time when the scan execution began. This helps users identify when the scan was initiated.
Completed -- Displays the date and time when the scan finished processing. This allows users to determine how recently the scan was completed and verify that the scan has finished successfully.

Cookies Tab
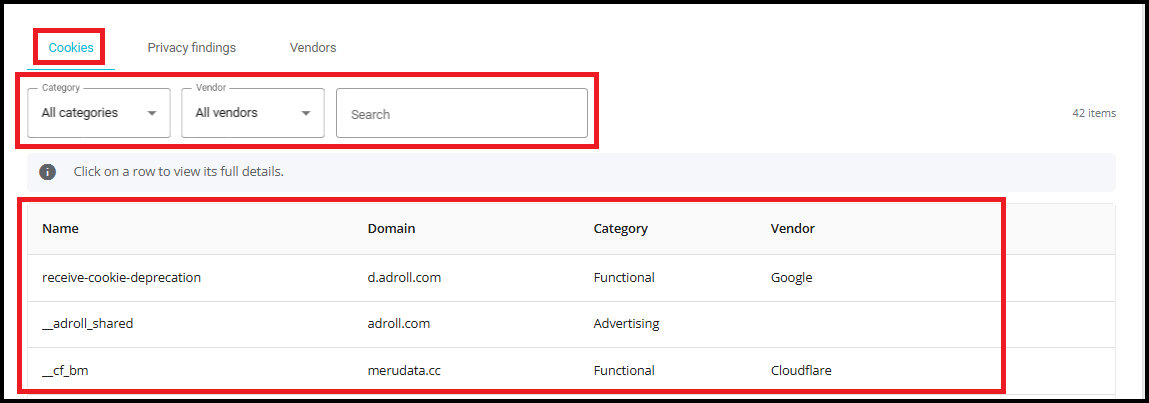
The Cookies tab displays all cookies identified during the selected scan and provides filtering and search options to help users quickly locate specific cookies.
Note: The Change Type dropdown and Reclassified Only toggle are displayed only when version comparison is available, i.e., when the selected configuration and website have more than one scan version available for comparison.
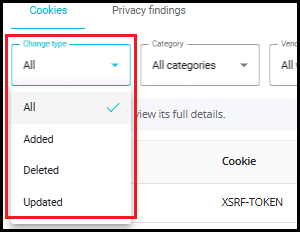
- Change Type - The Change Type dropdown allows users to filter the comparison results based on the type of change detected between the latest version and the previous version.
Available options include:
All -- Displays all changes identified between the compared versions.
Added -- Displays only cookies that were newly added in the latest version and were not present in the previous version.
Deleted -- Displays only cookies that existed in the previous version but are no longer present in the latest version.
Updated -- Displays only cookies whose details were modified between the compared versions.
- Reclassified Only - The Reclassified Only toggle allows users to view only cookies that have been manually reclassified between the compared versions.

Category -- Use the Category dropdown to filter cookies by their classification, such as Functional, Advertising, Analytics, or other available categories. For example, if you want to view only functional cookies, select Functional from the dropdown.
Vendor -- Use the Vendor dropdown to filter cookies associated with a specific vendor. This helps users focus on cookies provided by a particular third-party or service provider.
Search -- The search box allows you to search for cookies using either the cookie name or the domain. This is useful when looking for a specific cookie or identifying all cookies associated with a particular domain.
Cookie Details Grid -- The grid displays the scan results, including:
Name -- The name of the cookie.
Domain -- The domain on which the cookie is present.
Category -- The category assigned to the cookie.
Vendor -- The vendor associated with the cookie.
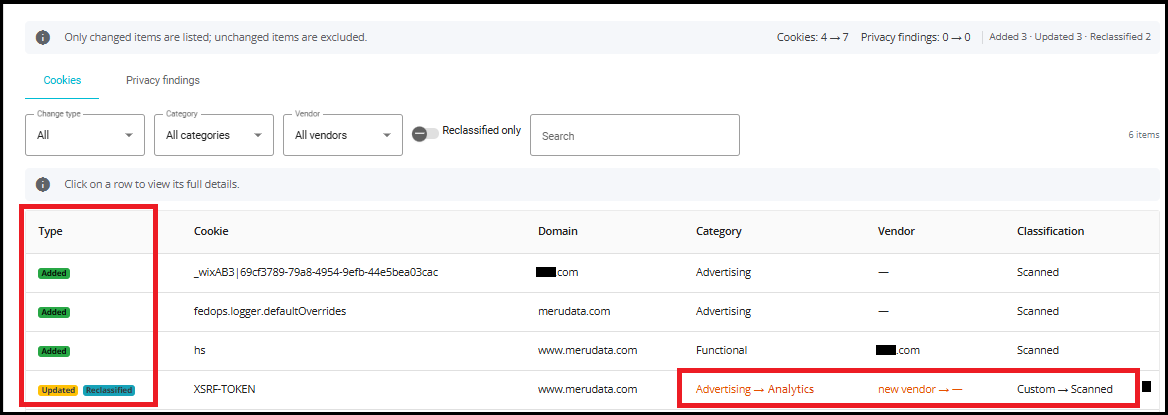
Note: The Type and Classification columns are displayed only when the report is showing a version comparison, i.e., when more than one scan version exists for the selected configuration and website.
Type Column - The Type column indicates the kind of change detected for a cookie between the compared versions.
Classification - The Classification column indicates how the cookie's category was assigned.
Possible values include:
Scanned -- The cookie category was assigned automatically by the scanning engine.
Custom -- The cookie category was manually modified by a user.
During version comparison, the column displays the previous and current classification source in the following format: Previous Value → Current Value
Scanned → Custom - The cookie was originally classified by the scan engine and was later manually modified by a user.
Custom → Scanned - The cookie was previously manually classified, but the latest version reflects the classification assigned by the scan.
Example
Suppose the report compares Version 41 (Scan) against Version 40 (Reclassified):
A newly discovered cookie will appear with the change type Added.
A cookie that no longer exists in the latest scan will appear as Deleted.
If a cookie's vendor, category, domain, or other details have changed, it will appear as Updated.
If a cookie was manually moved from one category to another (for example, Advertising → Analytics), it will appear as Reclassified.
Updated + Reclassified: This means the cookie was modified and its classification was also changed when compared to the previous version.
Viewing Full Cookie Details
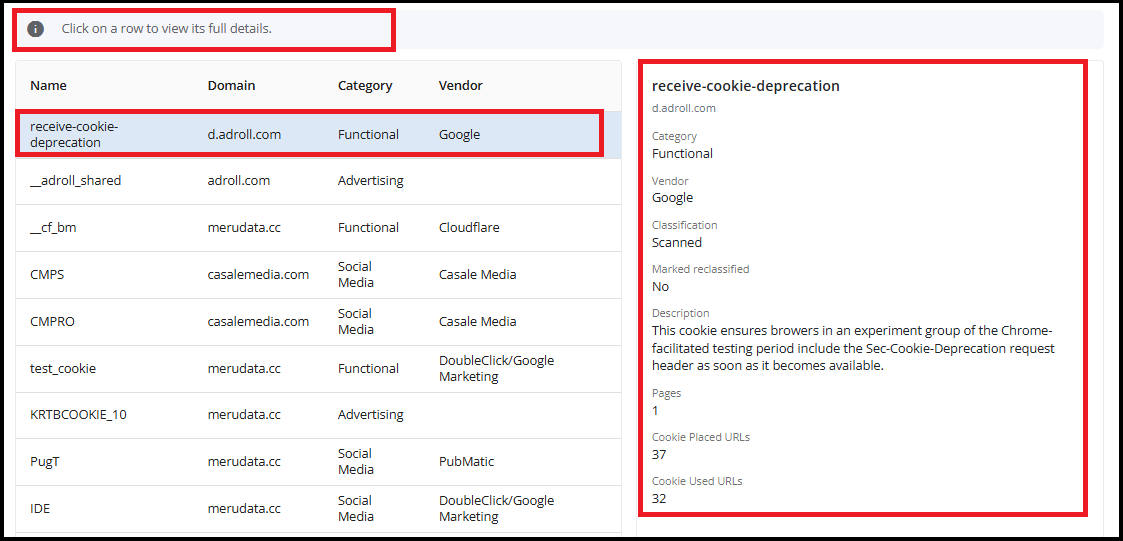
To view detailed information about a cookie, click on any row in the Cookies grid. When a cookie is selected, a detailed information panel is displayed on the right side of the screen.
Privacy Findings Tab
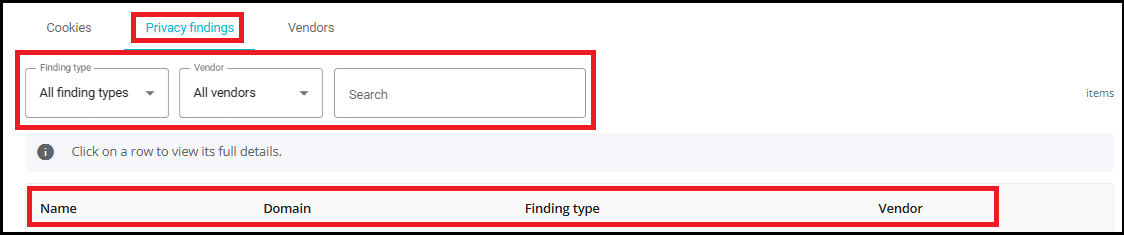
The Privacy Findings tab displays all privacy-related findings identified during the selected CCM scan. These findings help users identify potential privacy compliance issues, monitor scan results, and review findings across different websites and configurations.
Note: Version comparison is currently not available for Privacy Findings. Unlike the Cookies tab, Privacy Findings cannot be compared across different scan versions. Users can view privacy findings for the selected version, but changes between versions (such as added, removed, or modified findings) are not currently supported.
The tab provides filtering and search options to help users quickly locate specific findings:
Finding Type -- Use the Finding Type dropdown to filter findings by their classification. For example, you can view only a specific type of privacy finding instead of displaying all findings.
Vendor -- Use the Vendor dropdown to filter findings associated with a particular vendor or third-party service.
Search -- The search box allows you to search for findings using the finding name or domain, making it easier to locate a specific privacy finding.
Privacy Findings Grid -- The grid displays the privacy findings identified during the scan, including:
Name -- The name of the privacy finding.
Domain -- The domain where the finding was detected.
Finding Type -- The category or type of privacy finding.
Vendor -- The vendor associated with the finding.
Vendors Tab
Note: The Vendors tab is available only in the Single Report View.
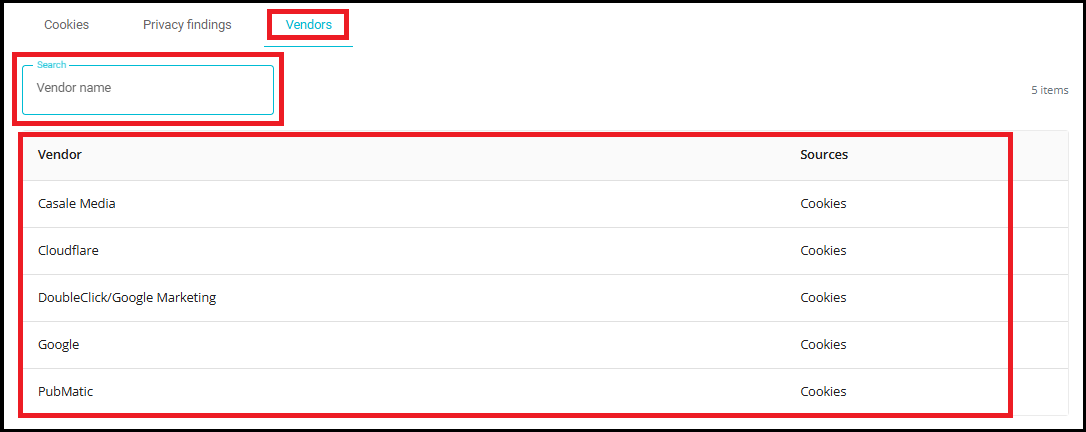
The Vendors tab provides a consolidated view of all vendors identified during the selected CCM scan. This tab helps users understand which third-party vendors are present across the scanned website and the source through which they were detected.
The tab includes the following features:
Vendor Search -- Use the search box to quickly find a vendor by entering its name. This is useful when reviewing websites with a large number of detected vendors.
Vendor Grid -- Displays a list of all vendors identified during the scan, along with the source from which each vendor was detected.
- The Build Latest Report button is used to manually generate the most updated version of the report. When you click this option:
The system initiates a fresh scan of the report data. It checks for any new changes, updates, or additions in the source data.
A new Report Version is created automatically.

- Once the version is generated, a confirmation message appears at the bottom of the screen indicating that "Report Version created successfully".

- Check the "Show in Dashboard" box to display the report on the main dashboard.

- Once the checkbox is selected, a confirmation message appears at the bottom of the page indicating that the report has been successfully added to the dashboard.

- The report appears on the main dashboard.
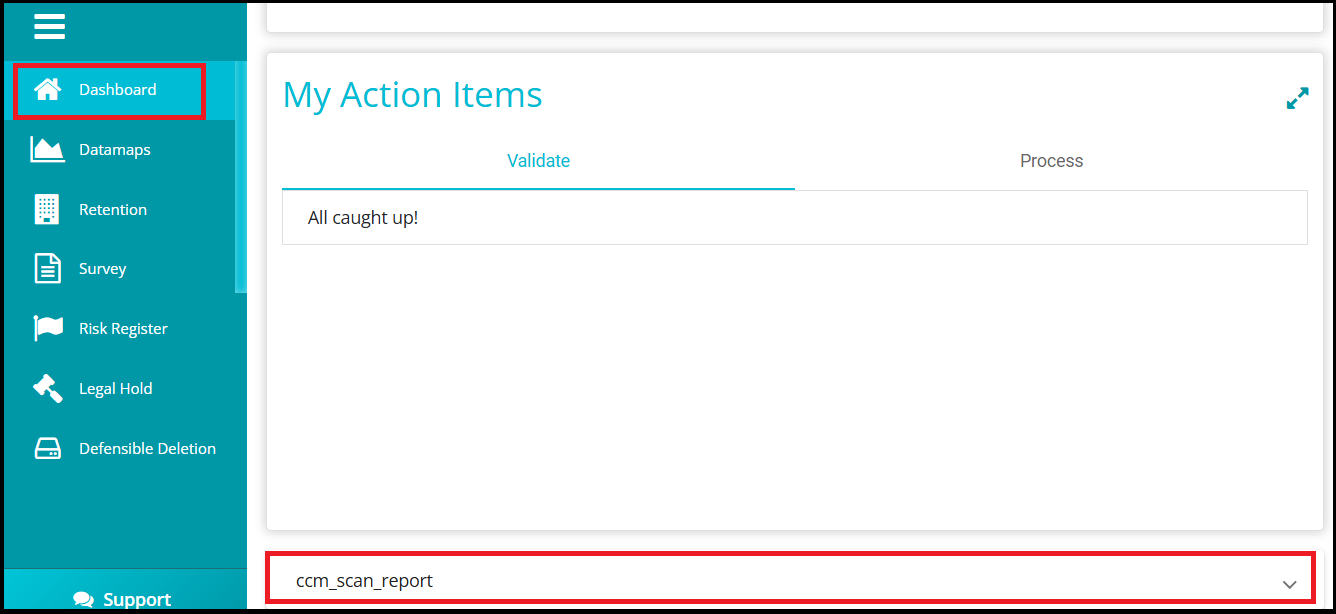
- Click on the report to view it directly on the dashboard instead of navigating to the Reports module.